Saturday, August 29, 2015

Howdy folks :)

my apologies for those that follow here or google + that dont use Facebook.. since that is a more active communitiy, thats where my posts tend to be, but will be doing some catch up posts here to show off what has been accomplished, and display just how much further I have yet to go! (grin)

just sharing a few pics today.


this one is 11 X 60 Marbled, hand hemmed silk scarf. Blue, with green and white highlights )

276


Saturday, August 22, 2015

Slowly climbing the learning curve :)

been trying alot of different things lately, since I'm relatively new to the whole colors and fashion thing..

Latest creation (well, thats ready for a viewing)  was a fun one, did a double layer of dying on it, started with black silk initially.  the pictures do NOT do it justice.. methinks I'm gonna have to do some studying on photography!

11 X 60 habotai Silk Scarf, hand hemmed.


Friday, May 29, 2015

Mornin folks ) Sharing some new pieces!

all of these are 17X17 silk Handkerchiefs.


my photographic abilities dont do it justice, but this is a closeup of a part of the one above.. alot of layers to the section :)


Wednesday, April 15, 2015

Let playtime begin!!

Today I finally felt I had all the ingrediants here to get to "work" so to speak :)

Had assembled my wet bed for dying,  sufficient paints from a marbelling kit, brushes, dispersant, and Methocel as a thickener..  so away I went!

it's an interesting process, included with the Innovation Marbling Kit, Japanese Suminagashi is a sheet of small cardstock with precut circles for floating on the water, Those are used to drop ink on directly so that it doesn't sink to the bottom.  as you can see in the upper, and lower left circles of paint, in the middle is the cardstock.  As the ink runs off the paper, it begins to disperse on the surface of the water/Methocel.  how and in what direction can kinda be influenced by your placement of the drop, but there is a definite random element there.

After getting what I felt was a fair amount of color floating, it was time to Play... in this instance that was simply taking a bamboo skewer that I had laying around and moving it through the ink so leave swirl marks, or in the case of the blue colors on the lower side, simply trying to shift thier appearance as an experiment.  Remember, I'm a newbie and still figuring it out as I go :)

As you can see, when you do have the ink successfully floating, you can shift it around and change appearance very easily :)  in this case by moving the skewer through it to change the shape of things in an attempt to make it more interesting


This is the finished Handkerchief for that one.. to me a successful experiment, allowing me to see how the colors come out, and what movements can produce.  I didn't really have anything in mind when I started other than learning, so it works on that point and it helped me refine what it is I'm looking for. 

Monday, April 13, 2015

First attempts at using the wet bed.

The next stop on this voyage of exploration is to get my materials together for the actual dying of the fabric.  I was fortunate enough to have available some Habotai Silk Scarf Refill Pack (Ready-to-dye) available, so fabric wasnt an issue for at least a few attempts if I so decided, and after doing some web research I ordered Innovation Marbling Kit, Japanese Suminagashi
 as my starting color set.  I had read that all that was needed with the Boku Undo set was to float the ink on the water, using a brush to apply it to the water and let it spread out.. well, my results were a bit different.  Included in the set are a few paper circles which "should" enable you to use the provided droppers to place ink on and let them spread from that floating surface..  While I had some sucess with that, mostly what the ink seemed to do was sink.  I tried diluting it in small mixing cups, but then the color was to diffuse for what I was hoping to do. 

after additional reading.. I purchased some Kodak Photo-Flo 200 16oz
 in an attempt to get the dyes to float better.. Initially this seemed to be great, but again the dispersion was way to complete!  the dye would virtually disappear as it got thinner and thinner.. it was much easier to make concentric rings though and as one color would push into the other I could see it being a viable use for some subtle pieces.. and I like subtle!! so in time it's very likely that I will put this to good use!

the problem I had with the Photo Flo was that after a bit of time on the surface it seemed to lose the flotation property (personal thought is that the photo flo evaporates, and then dye that remains sinks, but just my opinion) so it wasnt a winner in the long run for Large areas, by the time I was done applying dye at one end of the wet bed, the ink at the other was beginning to sink :(

Soo.. Next item to try! 

After more research, and more data given up to watching videos of other artists efforts.. I decided to thicken the water and see if that would work for me.  Most easily available seemed to be 2 options.  Jacquard Paint, Dye & Art Products CHM2004 Methocel 1lb
 With prices like those, I of course went with the cheaper option and ordered some Methocel.  Its as this point that I began to consider the costs of this endeavor.. to make a full wet bed with the Methocel I would be using about 12oz per, and while that should last me a few days before going bad, I began to realize that I was gonna need alot of materials and put in long days of dying to pull the most bang for the buck.. We shall see what happens in the long run, but looks like I will be doing this in spurts as I get supplies. :)

to this point, I hadnt taken any pics of my attempts, there really wasnt anything to see but rapidly diffusing color to the point of vanishing.. but with the addition of the Methocel, I was easily able to get the dyes to float on the wet bed, and I could see that soon the fun would begin


Saturday, April 11, 2015

Construction of my workshop..

One of the (to me) more difficult aspects of doing Suminagashi, is having a wet working table.. granted, if your working on sheets of paper, it's relatively easy to just pick up a plastic container from wal-mart, or Home Depot and work in that.

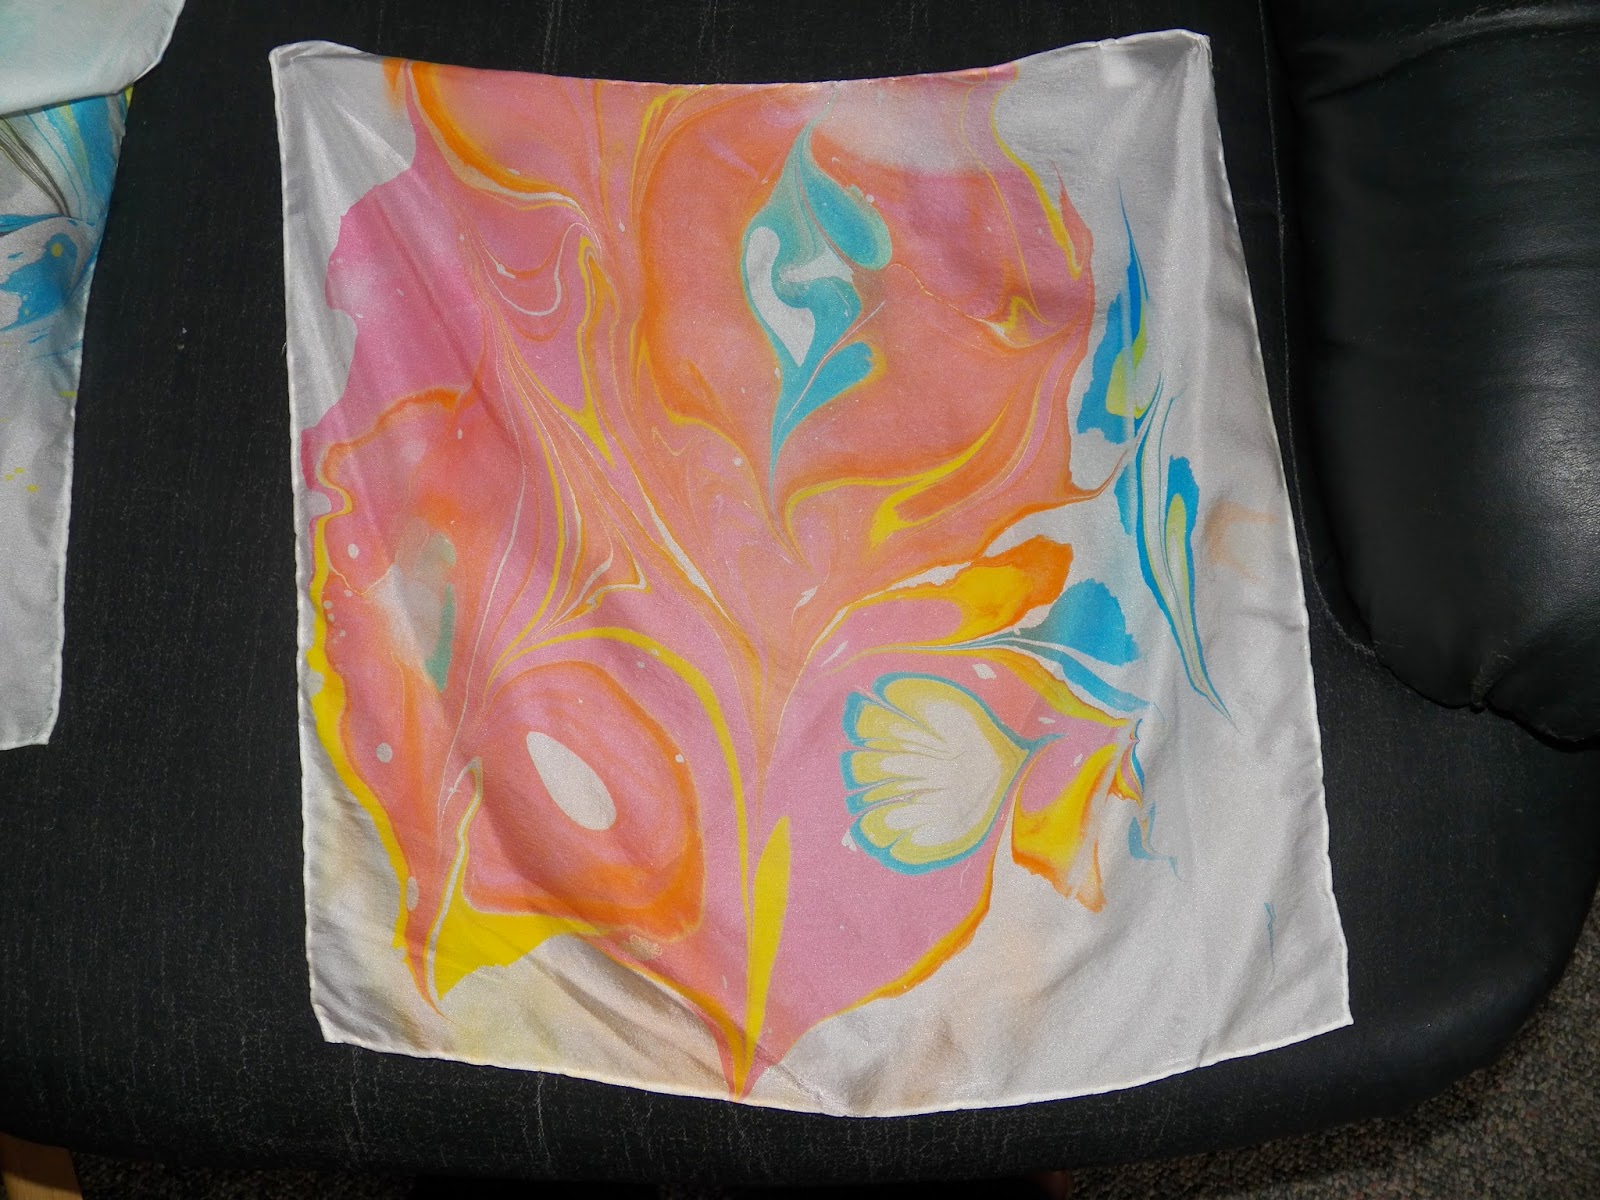
My dreams have been a bit more grandiose.  I didn't want to set myself up with a small tub when what I was interested in doing was Silk Scarves for Ladies apparel.  Why not build something that would fulfill my needs in either case?

After thinking about dimensions for a time, I decided that the easiest size to construct would be
24" X 96" simply cutting a sheet of wood in half and setting up rails on the side to contain the liquid.  Thats exactly what I did.

I got some pieces of 3/4 inch PVC piping (because Home Depot was out of the fittings I wanted in the 1/2 inch size) a sheet of 1/2 inch OSB sheeting to use as the base wood (cheaper than regular plywood) and had Home Depot cut it in half lengthwise.

 With a drill and hacksaw, I was able to easily construct a frame that would allow sheet plastic to be pulled over it and maintain both a portable, and fully reusable wet bed for water dying. :)

Of course, it wasn't quite that easy..  in the setup pictured, the table isn't quite level.. so when I started to fill it and the water weight grew.. it pulled the sheet plastic on one side more than the other and next thing I knew I had water pouring out on the downhill side.   Sometimes I learn the best lessons about being more patient :)


that added another item to the list, clamps or something to enable me to secure the plastic sheeting.. Since I'm doing my best to do this low budget until I know I'll stick with it, I went out and got some clothes pins, and they work fine at adding enough tension to the plastic to keep it from dumping on me!

First step completed!  it all comes apart, and I can stand it up against the wall of the garage if needed between sessions/experiments, and is fully usable when I'm in the mood!

Friday, April 10, 2015

An Interest in Suminagashi

Howdy folks, Thanks for stopping by!

Recently I came across some images of a Suminagashi  video and it started the thoughts flowing in my mind...   I really enjoyed how subtle some of the creations could be, and I decided it was time to add a new hobby to the mix!

so I'm starting out slow and trying to gather the materials needed to work, Not on paper as is traditional, but Silk.

As I learn and progress, I will update my progress and add pics here, don't expect a lot initially, I think it's going to be a slow process, and it's hitting summer, so will be out and about camping and hiking as well, but PLEASE, follow and come along with my journey if Silk and dyes are your thing!  Will be happy to spend the time with you!

An example of what I have in mind is HERE  though I also might try my hand at Ebru  At this point, it's all a grand experiment :)